
📝 en ~ 11 min read ~ ☕
Next.js TypeScript serverless deploy with SSR and ISR with AWS CDK
Share this post
Incremental Static Regeneration is the Next.js superpower. We’ll deploy a Next.js webapp in AWS using Lambda@Edge and CloudFront with support for SSR and ISG. Both our Next.js webapp and our Infrastructure as Code (IaC) will use TypeScript, using the Cloud Development Kit (CDK).
When you have a highly dynamic webapp with a lot of content, your number of pages will grow and grow. Static generation is great, but more pages, more time to build. Server Side Rendering is great to solve some of these problems but takes its cut on Time To First Byte (TTFB). Also, long builds with unnecessary computation might also incur additional expenses. Ideally, your application is intelligent enough to understand which products changed and incrementally update those pages with no full rebuild. And Incremental Static Regeneration just do that in Next.js. Until now I was just able to deploy functional webapps with ISR in AWS using containers (ECS or Fargate), but now, thanks to new releases for CDK Construct we can make full serverless deployment of rich webapps on AWS with CDK.
What you need to know
Section titled What%20you%20need%20to%20know- Level 200: Intermediate
- Have Node installed;
- You should have an AWS CLI and setting your credentials;
- You should have CDK installed and bootstrapped in your account;
- Some TypeScript knowledge needed.
Gotta Fetch’Em All!
Section titled Gotta%20Fetch%u2019Em%20All%21Our application will fetch data from the PokéAPI — will be not much fancy, just a regular page that fetches some data and render a page server-side, and in a specific route, we’ll make a “starter build” with the first 25 Pokémons, and then regenerate on the go new Pokémons as requested.
I generated all the types, Pokedex.ts and Pokemon.ts from
quicktype. Even their examples are from
PokéAPI! I used their VS Code
Paste JSON as Code extension.
It takes the API JSON output and returns interfaces and types to better deal
with our logic. The autocomplete for the nested attributes on the JSON tree of
an object makes the developer experience great, this is what TypeScript was born
for.
Next.js
Section titled Next.jsThis tutorial assumes you already know how to setup your environment and take
your first steps with Next.js (install, running, create some pages). And knows
what is TypeScript, which, has an excellent support on Next.js. To generate a
brand new project just run your weapon of choice npm or yarn:
npx create-next-app --ts# oryarn create next-app --typescriptOr read the great official documentation from Next.js team on TypeScript integration.
We’ll use the pattern to create an /src folder and place our pages and
components folder there. I like to create at root level a lib and types
folder and a build folder with the code to deploy our stack. After install
all dependencies, dev dependencies and deploy it to AWS, your root folder for
this project will look like this:
. public/ lib/ src/ node_modules/ build/ types/ cdk.out/ cdk.json bin.ts stack.ts next-env.d.ts next.config.js package-lock.json package.json tsconfig.json README.mdSince we don’t need build or cdk.out to be on version control, remember to
place both on your .gitignore file.
TSConfig
Section titled TSConfigOur tsconfig.json will work both for our CDK and our Next.js. How cool is
that?
{ "compilerOptions": { "alwaysStrict": true, "downlevelIteration": true, "esModuleInterop": true, "forceConsistentCasingInFileNames": true, "inlineSourceMap": true, "lib": ["es2020", "DOM"], "moduleResolution": "node", "noEmitOnError": true, "noFallthroughCasesInSwitch": true, "noImplicitAny": true, "noImplicitThis": true, "noImplicitReturns": true, "noUncheckedIndexedAccess": true, "noUnusedLocals": true, "noUnusedParameters": true, "resolveJsonModule": true, "strict": true, "strictBindCallApply": true, "strictFunctionTypes": true, "strictNullChecks": true, "strictPropertyInitialization": true, "stripInternal": true, "target": "ES2020", "typeRoots": ["node_modules/@types"], "useDefineForClassFields": true, "allowJs": true, "skipLibCheck": true, "noEmit": true, "module": "commonjs", "isolatedModules": true, "jsx": "preserve", "baseUrl": ".", "paths": { "@/components/*": ["./src/components/*"], "@/lib/*": ["./lib/*"], "@/pages/*": ["./src/pages/*"], "@/types/*": ["./types/*"] } }, "exclude": ["node_modules"], "include": ["src", "next-env.d.ts", "**/*.ts", "**/*.tsx", "lib"]}Some notes about it: compilerOptions.lib must have [‘es2020’, ‘DOM’] at
least. Our application will have a life in the lambda functions in Node.js and
in the browser as a JavaScript webapp. I always use absolute paths
compilerOptions.paths[‘@/components/*’] per example. It makes so clean the
imports and is more clear the domains. For this app we’ll follow the strict
path.
CDK dependencies and configurations
Section titled CDK%20dependencies%20and%20configurationsAll CDK dependencies are development dependencies. I will show examples in npm
from now on, but feel free to use yarn or whatever please you.
npm install -D aws-cdk @aws-cdk/core @sls-next/cdk-construct @sls-next/lambda-at-edge @aws-cdk/aws-lambda ts-nodeAs highlight, aside from
CDK and its construct libraries,
ts-node is a TypeScript execution engine and REPL for Node.js.
It JIT transforms TypeScript into JavaScript, enabling you to directly execute
TypeScript on Node.js without pre-compiling. This is accomplished by hooking
node’s module loading APIs, enabling it to be used seamlessly alongside other
Node.js tools and libraries.
And we’ll need some types for our webapp:
npm install -D @types/gtag.js @types/node @types/reactSo, we create cdk.json:
{ "app": "npm run deploy"}That will instruct CDK to run a specific script we need to add to the scripts
section of the package.json along side Next.js ones:
"scripts": { "dev": "next dev", "build": "next build", "start": "next start", "cdk": "cdk", "deploy": "ts-node bin.ts" }So, the deploy command will run the file bin.ts:
import * as cdk from "@aws-cdk/core";import { Builder } from "@sls-next/lambda-at-edge";import { NextStack } from "./stack";
const builder = new Builder(".", "./build", { args: ["build"] });
builder  .build(true)  .then(() => {    const app = new cdk.App();    new NextStack(app, "NextJsPokeStack", {      env: {        region: "us-east-1",      },      analyticsReporting: true,      description: "Testing deploying NextJS Serverless Construct",    });  })  .catch(e => {    console.error(e);    process.exit(1);  });
That is importing the stack.ts file, with our infra declaration for the
NextJSLambdaEdge:
import * as cdk from "@aws-cdk/core";import { Duration } from "@aws-cdk/core";import { NextJSLambdaEdge } from "@sls-next/cdk-construct";import { Runtime } from "@aws-cdk/aws-lambda";
export class NextStack extends cdk.Stack {  constructor(scope: cdk.Construct, id: string, props: cdk.StackProps) {    super(scope, id, props);    new NextJSLambdaEdge(this, "NextJsApp", {      serverlessBuildOutDir: "./build",      runtime: Runtime.NODEJS_12_X,      memory: 1024,      timeout: Duration.seconds(30),      withLogging: true,      name: {        apiLambda: `${id}Api`,        defaultLambda: `Fn${id}`,        imageLambda: `${id}Image`,      },    });  }}
Checkout the docs for more
available props.
I recommend the use of naming each one of three lambda functions created:
apiLambda, defaultLambda and imageLambda. Because otherwise will create
with a specific name and if you happen to deploy another stack in the same
account you will get an error about the a function with that name already
exists. So, rename your stacks or even better, add some randomness to names.
We will create two different renders, [ditto].tsx for Server Side Rendering
(SSR), that is basically the same of static props, but in server side and
because of it, dynamic by nature.
import { GetServerSideProps } from "next";import Head from "next/head";import { getPokemonData } from "@/lib/fetch";import PokemonForm from "@/components/pokemon";
import type { Pokemon } from "@/types/Pokemon";
interface PokemonApi {  data: Pokemon;}
const Ditto = (props: PokemonApi) => {  if (!props?.data?.name) return null;
  const pokeName =    props.data.species.name.charAt(0).toUpperCase() +    props.data.species.name.slice(1);
  return (    <section className='container'>      <Head>        <title>{pokeName} | PokéServeless - AWS Serverless Lambda@Edge</title>        <meta          property='og:title'          content={`${pokeName} | PokéServeless - AWS Serverless Lambda@Edge`}          key='title'        />      </Head>      <header>        <h1>PokéServerless — Server Side Rendering</h1>      </header>      <PokemonForm poke={props} />    </section>  );};
export const getServerSideProps: GetServerSideProps = async context => {  let data;
  const { ditto } = context.query;
  if (typeof ditto === "string") {    data = await getPokemonData(ditto);  } else {    data = {};  }
  return { props: { data } };};
export default Ditto;
And [porygon].tsx, to do Incremental Static Regeneration (ISR). This is an
overview of the flow of ISR:
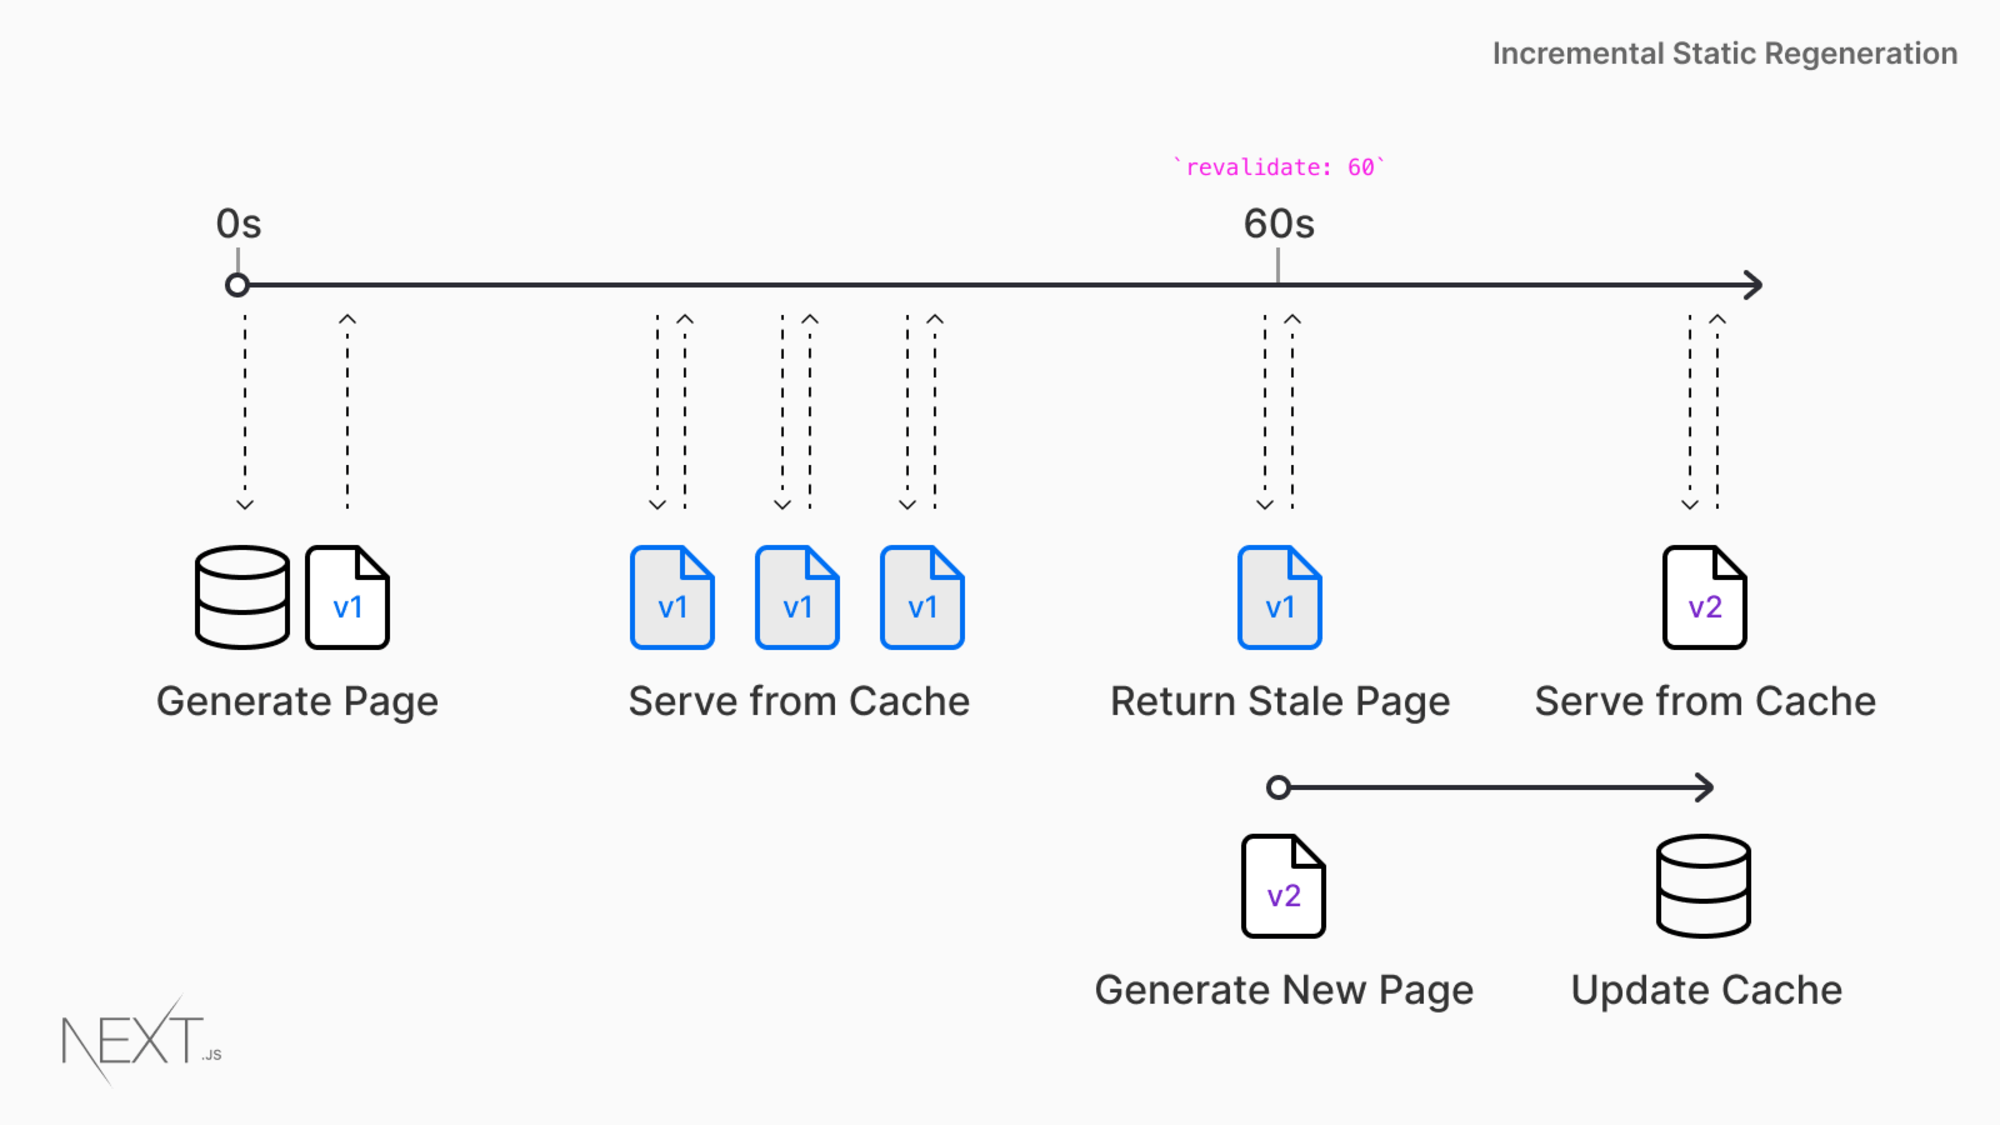
Its from Lee Robinson’s “A Complete Guide To Incremental Static Regeneration (ISR) With Next.js” pots and its a very fair title.
This is my code:
// Example of ISGimport { GetStaticPaths, GetStaticProps } from "next";import Head from "next/head";import { useRouter } from "next/router";import { getPokemons, getPokemonData } from "@/lib/fetch";import PokemonForm from "@/components/pokemon";
import type { Pokemon } from "@/types/Pokemon";import type { Pokedex } from "@/types/Pokedex";
interface PokemonApi {  data: Pokemon;  date: string;}
const Porygon = (props: PokemonApi) => {  if (!props?.data?.name) return null;  const router = useRouter();
  if (router.isFallback) {    return <div>Loading......I had to fetch incrementally!!</div>;  }
  const pokeName =    props.data.species.name.charAt(0).toUpperCase() +    props.data.species.name.slice(1);
  return (    <>      <section className='container'>        <Head>          <title>            {pokeName} | PokéServerless - AWS Serverless Lambda@Edge          </title>          <meta            property='og:title'            content={`${pokeName} | PokéSSR - AWS Serverless Lambda@Edge`}            key='title'          />        </Head>        <header>          <h1>PokéServerless — Incremental Static Regeneration</h1>        </header>        <PokemonForm poke={props} />      </section>      <p className='poke-center'>{`Generated at ${new Date(        props.date      ).toLocaleString()}`}</p>    </>  );};
export const getStaticProps: GetStaticProps = async context => {  let data;
  if (context.params) {    data = await getPokemonData(context.params.porygon as string);  } else {    data = {};  }
  return {    props: {      data,      date: new Date().toISOString(),    },    revalidate: 60 * 5,  };};
export const getStaticPaths: GetStaticPaths<{ porygon: string }> = async () => {  const pokemons = (await getPokemons(25)) as Pokedex;
  const paths = pokemons.results.map(pokemon => {    return { params: { porygon: pokemon.name.toString() } };  });
  return {    fallback: true,    paths,  };};
export default Porygon;
To leverage all the power of components we’ll use the same component for each
strategy, which we’ll call… pokemon.ts:
import Image from 'next/image'import Link from 'next/link'import Button from '@/components/button'import Spacer from '@/components/spacer'import { Pokemon, Type } from '@/types/Pokemon'
interface PokemonInfo {  poke: {    data: Pokemon  }}
const PokemonForm = (props: PokemonInfo) => {
  const pokeImage = props.poke?.data?.sprites?.other?."official-artwork"]?.front_default ?? props.poke?.data?.sprites?.front_default;
  const number = props?.poke?.data?.order;  const isPositive = number >= 1;  const pokeNumber = isPositive ? number : "Max version";
 return (    <>    <article className="ditto">        <Image          src={pokeImage}          width={240}          height={240}          alt={`Pokémon ${props?.poke?.data?.name}`} />
        <h1 className="poke-name">{props?.poke?.data?.name}</h1>        <p>Number: {pokeNumber}</p>        <p>Type:</p>        <ul className="poke-list">          {props?.poke?.data?.types?.map((info: Type, index: number) => (            <li key={index}> {info.type.name}</li>          ))}        </ul>
        <Button />      </article>
      <div className="poke-footer">        <div></div>        <div className="poke-options">            <div>              <Link href="/ssr">                <a title="Server Side Rendering">                  <Image                    src="https://raw.githubusercontent.com/ibrahimcesar/nextjs-ssr-cdk-aws/main/public/ditto.png"                    width="125"                    height="112"                  />                  <h2>Server Side Rendering<br/>(SSR)</h2>                </a>              </Link>            </div>
            <div>              <Link href="/isr">                <a title="Incremental Static Regeneration">                  <Image                    src="https://raw.githubusercontent.com/ibrahimcesar/nextjs-ssr-cdk-aws/main/public/porygon.png"                    width="125"                    height="112"                  />                  <h2>Incremental Static Regeneration<br/>(ISR)</h2>                </a>              </Link>            </div>        </div>        <div></div>      </div>    </>  )}
export default PokemonForm
It has do some checks, if the number is equal or bigger than one (because Dynamax and Gigamax versions doesn’t return numbers) and which image to use, and we render with the Image component from Next.js for optimization.
I also made two different “home pages” for each strategy, SSR and ISR, and you could checkout the bare-bones and ugly site for demonstration purposes only™.
Then, to deploy you just run in your root folder cdk and you should see and approve the changes and wait for ir to finish:
cdk deployIf you are like me and have several profiles in your AWS credentials file, as a
“advice”, I would argue to always explicit use cdk deploy --profile personal
or whatever you named to not mix environments, resources, stacks and accounts!
After done you’ll get a ✅ with the name of your stack, mine being
NextJsPokeStack and you can search the address in the CloudFront distribution,
or configure a domain in the props or output yourself this value from the
process if you needed.
And… done ✅ You successfully deployed Next.js serverless in AWS with the help of AWS CDK. This is the final infra created, made by the awesome tool cdk-dia:
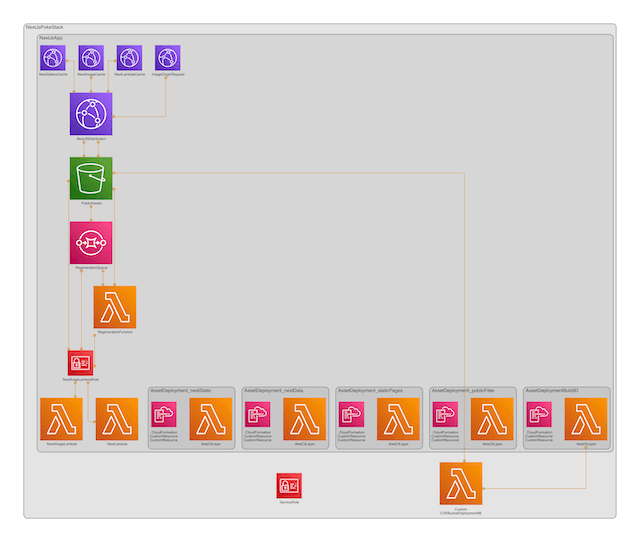
Earlier this year AWS launched the Amplify SSR support for Next.js but… is stuck at version 9 at the time — you can’t use the Image component and the ISR at the time. And we just made a isomorphic deployment of code AND infra with TypeScript.
Links
Section titled Links- Repo for this project
- Project Demo Home Page
- SSR Home
- ISR Home
- A SSR route example
/ssr: Scizor - An ISR route example
/isr: Lickitung